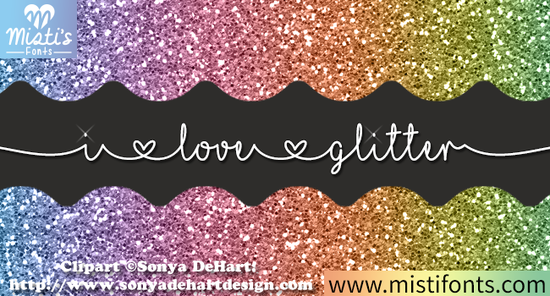
If you are looking for a typeface that adds instant personality without sacrificing readability, I Love Glitter Font is a strong choice for crafters and small business owners alike. Designed with a playful yet polished script style, this typeface brings a handcrafted feel to digital files and physical prints alike. Instead of relying on heavy graphics or complex layouts, you can achieve a professional look simply by placing text over clean backgrounds or textured papers. The letters feature soft curves and subtle flourishes that mimic brush strokes, making them ideal for labels, wedding stationery, social media graphics, and ready-to-print merchandise.
How do I pair this script with other design elements?
Script fonts thrive when they share space with simpler, more grounded typefaces. Pairing a decorative headline with a clean sans-serif or a straightforward serif body text creates balance and keeps your message readable. You will find better results when you limit your color palette to two or three tones that complement the visual weight of the letters. If you work frequently with layered compositions, testing your layout in grayscale first helps you spot contrast issues before adding final colors. Many creators mix this style with minimalist geometric shapes or soft watercolor washes to let the typography remain the focal point without overwhelming the viewer.
Can I use these letterforms for printable products?
Absolutely. Digital downloads sell best when they offer clear value and easy customization. You can generate quote posters, planner stickers, coloring sheets, and greeting cards by adjusting spacing, scale, and kerning to match different project sizes. The open curves in the alphabet make it easy to read even at smaller print dimensions, which is crucial for tags and packaging inserts. When preparing files for marketplaces like Etsy or Shopify, always export your designs at high resolution and include a brief guide for buyers on how to edit the text layers. Keeping your source files organized also makes it faster to create seasonal variations for holidays or themed collections.
Where should I look for complementary style options?
Building a cohesive collection often requires stepping outside your comfort zone. Exploring different handwriting styles can reveal how varying stroke weights change the mood of a layout. For instance, exploring soft romantic script collections shows how delicate lines work well with floral accents. Meanwhile, browsing resources dedicated to modern handwriting styles demonstrates how cleaner edges appeal to contemporary branding. Some sellers prefer a vintage photography vibe, and discovering typefaces tailored to photo-centric layouts provides great contrast against bold imagery. If your projects lean toward cozy, homemade aesthetics, reviewing packages labeled as warm handmade duo sets offers insights into pairing earthy tones with gentle scripts. Finally, exploring categories marked as authentic craft lettering highlights techniques for maintaining realism while scaling production.
What technical steps improve my workflow?
Starting your file preparation early saves time during peak selling seasons. Create templates with preset margins, bleed areas, and safe zones for cutting machines. Test your chosen typography on both screen mockups and actual paper samples to catch rendering errors before publishing. Exporting vectors whenever possible ensures your artwork scales cleanly across different product types. When you need a reliable reference for sourcing similar lettering, visiting a direct search for I Love Glitter Font provides quick access to updates and related bundles. Running regular audits on your existing assets helps you retire outdated formats and keep your store inventory fresh.
How do I integrate these files with cutting software?
Modern crafting platforms make it straightforward to convert text into cut-ready paths. Once you select your desired phrase, adjust the baseline alignment and apply an offset if you plan to create layered vinyl decals. Testing the material feed on scrap pieces prevents wasted supplies during full runs. Many instructors recommend practicing with standard cardstock before moving to thicker board or adhesive substrates. If you follow guided tutorials for designing shadow boxes or printable cards, you will notice how proper layer ordering dramatically improves the final physical product. Checking out structured lessons like the ones covering Designing Printable Cards in Cricut Design Space or Design Shadow Boxes in Cricut Design Space gives you step-by-step support for building professional finishes from simple text files.
What should I review before listing my products?
Quality control separates amateur uploads from established shops. Verify that all text outlines correctly, check that images embed properly, and ensure preview images accurately represent the final download. Read through your terms of use to confirm licensing aligns with your intended sales channels. Gathering feedback from early testers often reveals sizing or legibility tweaks you missed. Keep track of which product variations receive the most downloads so you can refine future releases accordingly.
- Check vector outline integrity across all letters
- Test print resolution on a home printer first
- Label layers clearly for customer editing ease
- Add fallback fonts in case users lack the original typeface
- Save working files in multiple editable formats
Start with a single template, refine the spacing until it feels balanced, and gradually expand your catalog based on buyer preferences. Consistent iteration leads to steady growth without overwhelming your initial setup.
 Explore Typography with the Daddy Font
 Handmade Fonts for Creative Design Projects
 Creative Projects with Stylish Handwriting Fonts
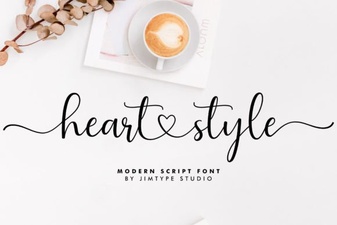 Heart Style Fonts for Creative Design Projects
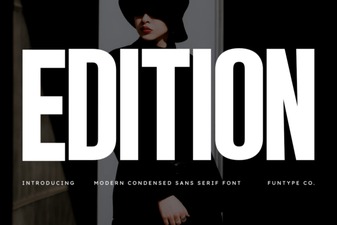 Edition Font: Design Choices for Creative Projects
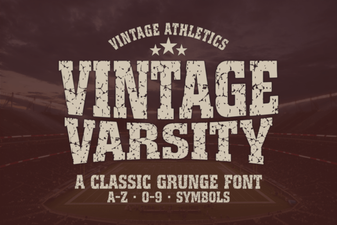 Capture Classic Charm with Vintage Varsity Font